#pants sewing
Explore tagged Tumblr posts
Visit Tumblr Blog
Explore Tumblr blogs with no restrictions, modern design and the best experience.
Last Seen Tumblr Blogs


Fun Fact
Tumblr Inc. is funded by 13 investors.
Text


Clemensia’s pants were the first garment to be finished. It’s a McCalls pattern.
The pants are made of a polyester gabardine fabric and flatlined with linen. I really should add a pocket
#cosplay#new york comic con#the ballad of songbirds and snakes#clemensia dovecote#the hunger games#cosplay work in progress#sewing projects#pants sewing#katsucon
4 notes
·
View notes
Text
"Don't just throw ripped jeans away, you can repair them using these 10 cute Visible Mending techniques!!" unfortunately my friend the first point of failure for every single pair of jeans i have owned in my life has been the Crotch and Ass. Knees: fine, cuffs: fine; but 3 years in, and all that stands between the world and my astronaut-patterned taint is 0.5µm of denim worn so thin that every squat threatens to tear it to shreds like wet toilet paper. If the Tiktok craft community could figure out a way to resurrect jeans afflicted in such a way that doesn't involve adding a whole ass buttpatch like some sort of inverse assless chaps situation then that'd be great
#and yes i have indeed experimented with trying to add invisible patches on the INSIDE of the jean but unfortunately#trying to sew anything to the non-euclidean hellscape that is the crotch area of a pair of pants#inevitably ends up 1. (hand-sewing) puckered as hell or 2. (machine sewing) w me accidentally sewing a leg hole closed 😔
69K notes
·
View notes
Text

they make me sick (i love them so much)
#guys can we please call them jade duo#some details in their designs: gem has an eyebrow piercing!!! and joel is wearing his wedding band on his necklace <3#also gem 100% hand sewed the little hearts onto her overalls and joel’s pants#wild life smp#wild life fanart#wild life finale#smallishbeans#joel smallishbeans#geminitay#geminitay fanart#smallishbeans fanart#wild life joel#wild life gem#life series#life series fanart#trafficblr#melon art!!
1K notes
·
View notes
Note
Any tips on learning to make buttonholes? I've been putting it off for.... *checks notes* like three years.... but better late than never and all that. I don't have any fancy machines so I gotta do it by hand but that seems right up your alley.
Thanks!
It IS up my alley, yes, I do most of my buttonholes by hand!
I'm actually part way through filming an 18th century buttonhole tutorial, but I expect it'll be a few more weeks before I finish that and put it on the youtubes, so in the meantime here's the very very short version. (The long version is looking like it'll probably be about 40 minutes maybe, judging by how much script I've written compared to my last video?)
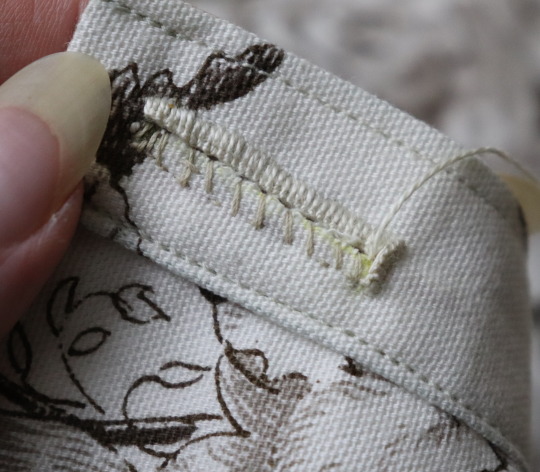
Mark your line, a bit longer than your button is wide. I usually use a graphite mechanical pencil on light fabrics, and a light coloured pencil crayon on dark ones. (I have fabric pencils too, but they're much softer and leave a thicker line.) You may want to baste the layers together around all the marked buttonholes if you're working on something big and the layers are shifty and slippery. I'm not basting here because this is just a pants placket.

Do a little running stitch (or perhaps a running backstitch) in fine thread around the line at the width you want the finished buttonhole to be. This holds the layers of fabric together and acts as a nice little guide for when you do the buttonhole stitches.

Cut along the marked line using a buttonhole cutter, or a woodworking chisel. Glossy magazines are the best surface to put underneath your work as you push down, and you can give it a little tap with a rubber mallet if it's not going through all the way.

I'm aware that there are some people who cut their buttonholes open using seam rippers, and if any of them are reading this please know that that is abhorrent behaviour and I need you to stop it immediately. Stop it.
Go get a buttonhole cutter for 10 bucks and your life will be better for it. Or go to the nearest hardware store and get a little woodworking chisel. This includes machine buttonholes, use the buttonhole cutter on them too. If you continue to cut open buttonholes with a seam ripper after reading this you are personally responsible for at least 3 of the grey hairs on my head.
Do a whipstitch around the cut edges, to help prevent fraying while you work and to keep all those threads out of the way. (For my everyday shirts I usually do a machine buttonhole instead of this step, and then just hand stitch over it, because it's a bit faster and a lot sturdier on the thin fabrics.)

I like to mark out my button locations at this point, because I can mark them through the holes without the buttonhole stitches getting in the way.
For the actual buttonhole stitches it's really nice if you have silk buttonhole twist, but I usually use those little balls of DMC cotton pearl/perle because it's cheap and a good weight. NOT stranded embroidery floss, no separate strands! It's got to be one smooth twisted thing!
Here's a comparison pic between silk buttonhole twist (left) and cotton pearl (right). Both can make nice looking buttonholes, but the silk is a bit nicer to work with and the knots line up more smoothly.

I've actually only used the silk for one garment ever, but am going to try to do it more often on my nicer things. I find the cotton holds up well enough to daily wear though, despite being not ideal. The buttonholes are never the first part of my garments to wear out.
I cut a piece of about one arm's length more or less, depending on the size of buttonhole. For any hole longer than about 4cm I use 2 threads, one to do each side, because the end gets very frayed and scruffy by the time you've put it through the fabric that many times.
I wax about 2cm of the tip (Not the entire thread. I wax the outlining/overcasting thread but not the buttonhole thread itself.) to make it stick in the fabric better when I start off the thread. I don't tend to tie it, I just do a couple of stabstitches or backstitches and it holds well. (I'm generally very thorough with tying off my threads when it comes to hand sewing, but a buttonhole is basically a long row of knots, so it's pretty sturdy.)

Put the needle through underneath, with the tip coming up right along that little outline you sewed earlier. And I personally like to take the ends that are already in my hand and wrap them around the tip of the needle like so, but a lot of people loop the other end up around the other way, so here's a link to a buttonhole video with that method. Try both and see which one you prefer, the resulting knot is the same either way.


Sometimes I can pull the thread from the end near the needle and have the stitch look nice, but often I grab it closer to the base and give it a little wiggle to nestle it into place. This is more necessary with the cotton than it is with the silk.
The knot should be on top of the cut edge of the fabric, not in front of it.

You can put your stitches further apart than I do if you want, they'll still work if they've got little gaps in between them.
Keep going up that edge and when you get to the end you can either flip immediately to the other side and start back down again, or you can do a bar tack. (You can also fan out the stitches around the end if you want, but I don't like to anymore because I think the rectangular ends look nicer.)
Here's a bar tack vs. no bar tack sample. They just make it look more sharp, and they reinforce the ends.

For a bar tack do a few long stitches across the entire end.

And then do buttonhole stitches on top of those long stitches. I also like to snag a tiny bit of the fabric underneath.

Then stick the needle down into the fabric right where you ended that last stitch on the corner of the bar tack, so you don't pull that corner out of shape, and then just go back to making buttonhole stitches down the other side.
Then do the second bar tack once you get back to the end.

To finish off my thread I make it sticky with a bit more beeswax, waxing it as close to the fabric as I can get, and then bring it through to the back and pull it underneath the stitches down one side and trim it off.


In my experience it stays put perfectly well this way without tying it off.
Voila! An beautiful buttonholes!


If you want keyhole ones you can clip or punch a little rounded bit at one end of the cut and fan your stitches out around that and only do the bar tack at one end, like I did on my 1830's dressing gown.

(I won't do that style in my video though, because they're not 18th century.)
Do samples before doing them on a garment! Do as many practice ones as you need to, it takes a while for them to get good! Mine did not look this nice 10 years ago.
Your first one will probably look pretty bad, but your hundredth will be much better!
Edit: Video finished!
youtube
And here's the blog post, which is mostly a slightly longer version of this post.
#ask#buttonholes#sewing#hand sewing#sewing tutorial#I've been procrastinating on the video this week#I want it done! I don't want to work on it I want new projects! I want to cut out more gloves!#currently forcing myself to do the last few buttonholes on these pants and then maybe I can cut out new gloves? as a treat?#but I hope I get some filming done tomorrow too
4K notes
·
View notes
Text
diy!
#altfashion#punk fashion#diy punk#punk aesthetic#diy fashion#punk#crust punk#crust pants#patch pants#emo fashion#sewing#diy patches#patches
3K notes
·
View notes
Text


These pants had been in The Pile for about 2 and a half years, and I finally finished them last month. I'm a bit behind on photographing & posting things, and I didn't notice until a couple days after taking the photos of me wearing them that my hem was partially turned up the whole time. Ah well.
They're made of a printed cotton twill that I got at least a decade ago, and I still have a lot of it because it was on a "buy 1 metre get 2 free" sale. I made another pair of pants out of it in 2016, but they wore out years ago.
I did most of the sewing on the industrial at my workplace, and used the blind hemmer for the hems, but did a fair amount of hand finishing elsewhere.
472 notes
·
View notes
Text

Only a couple days late addition to @vashwoodweek day 1: domestic
#drawn between 1 and 2 am... goodnight...#vash looks so content.. im gonna channel him tonight and get a good nights sleep#why is wolfwood sewing a patch on vash while he is still wearing the pants the patch is going on? idk. maybe it was an impromptu sewing sesh#its fine he wont accidentally stab him in the knee once or twice (lie)#take this as a modern au too. btw. they are normal and domestic and alright and have jobs. they nap on their couch#vashwoodweek#trigun#trigun fanart#vash the stampede#nicholas d. wolfwood#vashwood#my art
304 notes
·
View notes
Text


updated pics of my crusties!!! and another new pocket (the beads are the mlm and aroaceflux flags)!!! definitely closer to where i want them!!!
video of me doing a little spin under the cut
#punk style#punk rock#punk pants#punk patches#crust pants#crust punk#patches#patch pants#punk diy#diy punk#diy patches#diy sewing#diy or die#diys#diy#mine#mlm flag#aroaceflux flag#punk
260 notes
·
View notes
Text


current state of my patch/crust pants
ig @/vividstargore
#punk#crust punk#crust pants#patch pants#diy or die#diy#goth#emo#alternative#alt poc#patches#patchwork#sewing#wlw#lesbian#nonbinary#queer#queer punk#folk punk#cripple punk#punk diy#skramz#screamo
257 notes
·
View notes
Text

repainted some patches :p
edit: thank u so much for 1,000 notes :) these pants have been in a mild retirement while i focused on other crafts but i’m going to bring them back for their big sequel this summer !! more to come …. >:)
#punk pants#diy punk#diy fashion#crust punk#folk punk#punk#queer punk#crust#diy patches#punk diy#patch pants#battle jacket#patches#patchwork#fashion#alternative#alt boy#alt fashion#alternative fashion#pants#diy#sewing#sewblr#punkblr#punk boy
1K notes
·
View notes
Text
Part 1 of my mending series! I embroidered the edge of the right pocket!
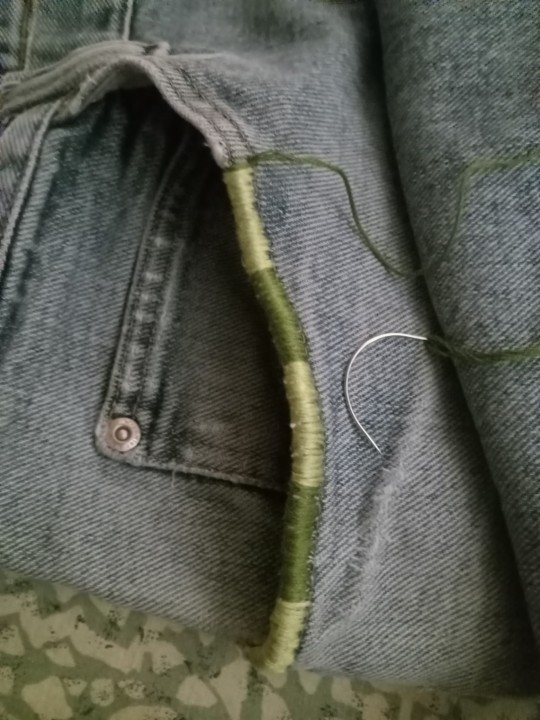

This alone took a while so I'm definitely taking my time with this project lol. But I'm making progress :)
I think I'll use browns or maybe blues for the left pocket for asymmetry and then next I'll tackle the waist band. Idk yet we'll see
[Image ID: two pictures of the right pocket on a worn out pair of light blue jeans. The top edge of the pocket is reinforced with light green and dark green embroidery thread and it alternates in-between the colors. Each block of color is about an inch long before it changes to the other color. The first image shows when it was almost done with the needle in the frame and the second image is the finished product. End ID]
#trash pants: reborn#solarpunk#solarpunk fashion#solarpunk aesthetic#punk#punk fashion#hopepunk#ecopunk#sewing#embroidery#mending#visible mending#sustainable fashion#sustainability#diy#solarpunk diy#punk diy#hatchet mends things
934 notes
·
View notes
Text
The Three D's
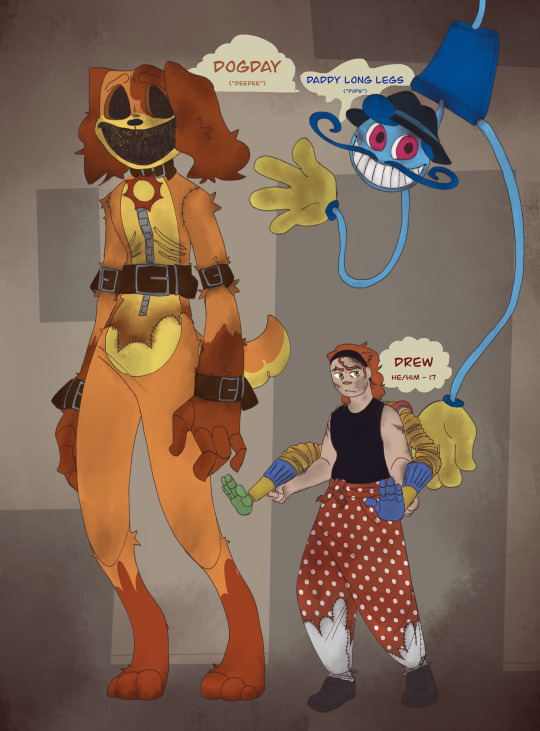
(Click for better quality)
I have a horrible habit of dropping any series-comics I try to make, so I thought it'd do a little story-ish ask event!!
So far, we've got the three D's: Dogday, Daddy Long Legs, and Drew.
Basic info and closeups!
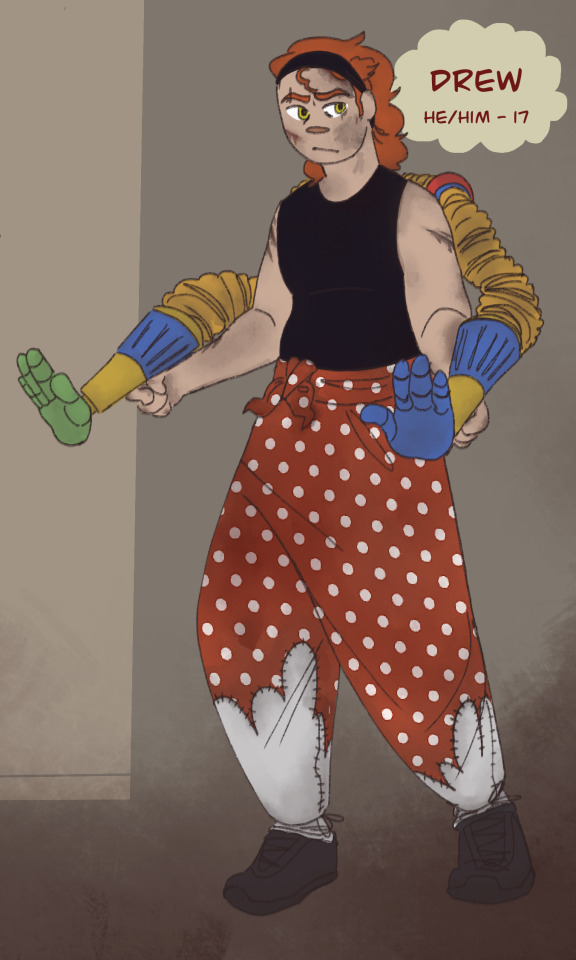
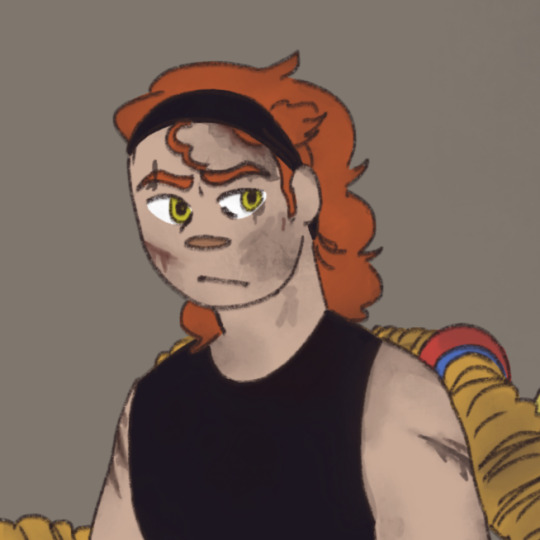
Drew, he/him, 18 yrs: the horror-loving nephew of an old Playtime Co. employee. Squawks like a strangled bird when surprised.
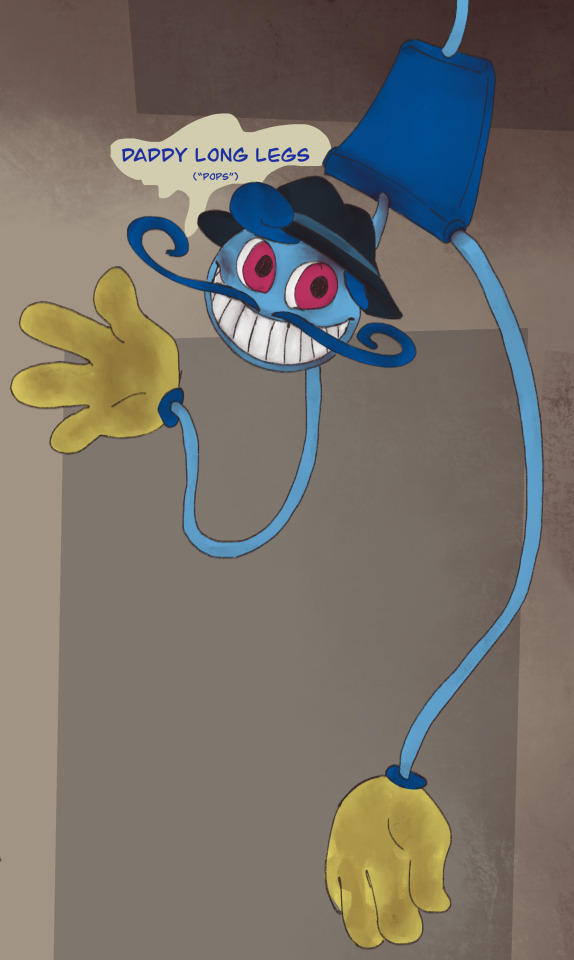
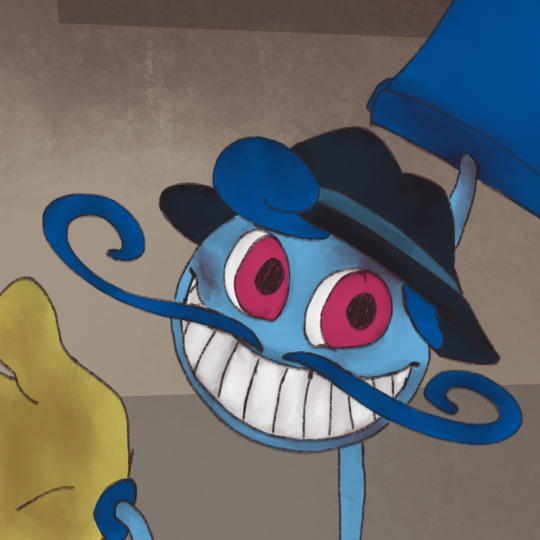
Daddy Long Legs, aka: "Pops:" If you could find a loving father from the 20s who wasn't a misogynist. Misses his wife, but doesn't blame Drew for her death.
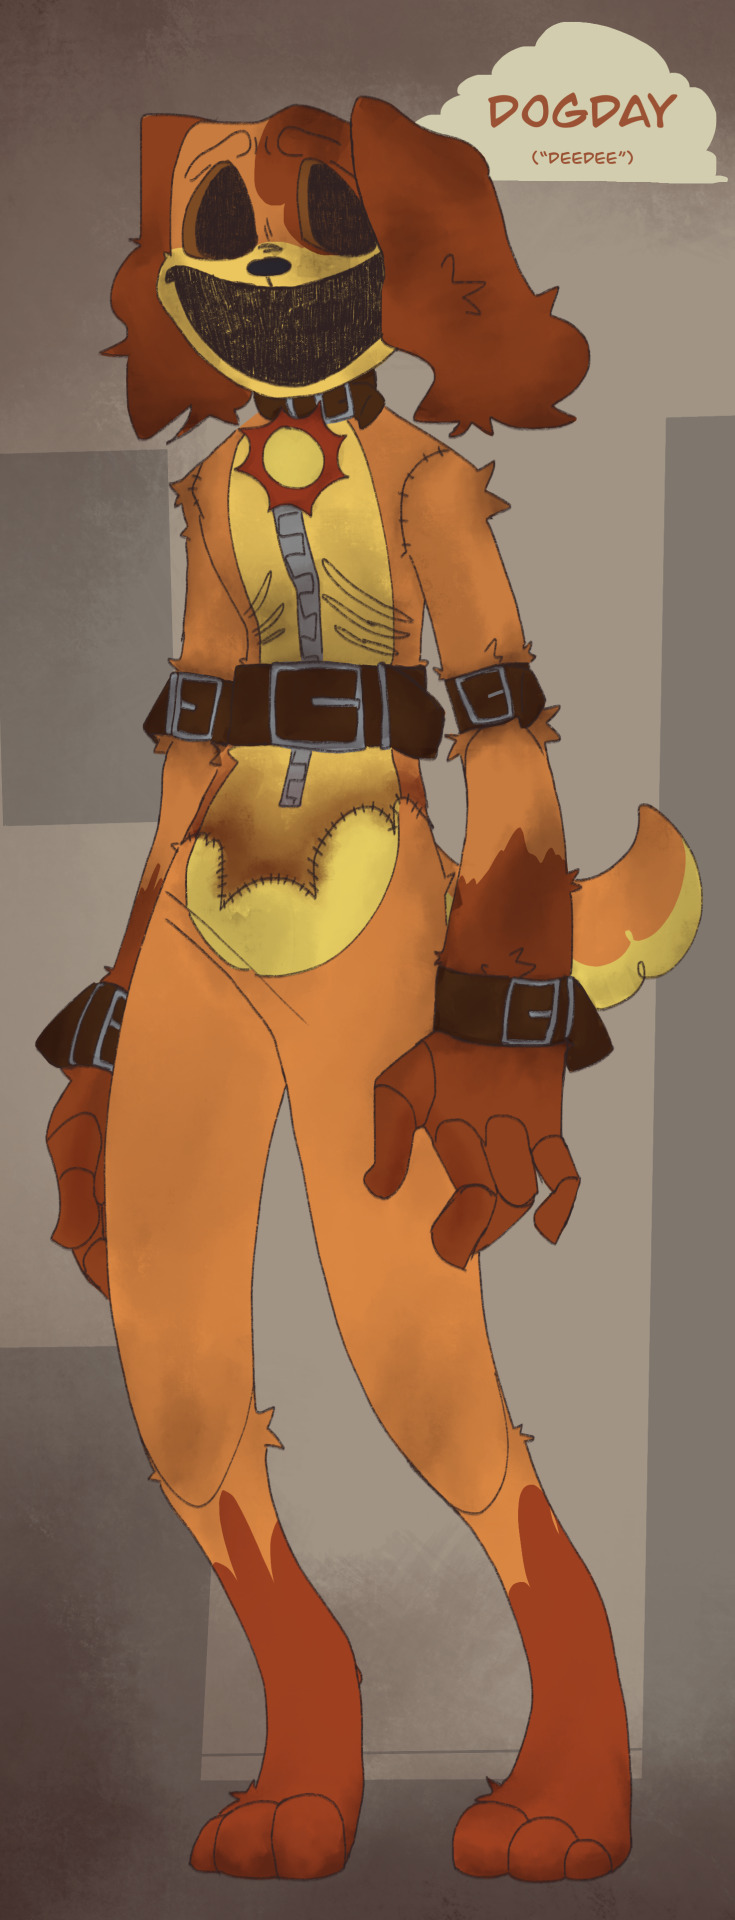

Dogday, aka: "Deedee" or "Dogs:" The last, overly traumatised Smiling Critter who really needs a hug. Drew found him some spare legs in a closet somewhere.
Without dirt and grime:
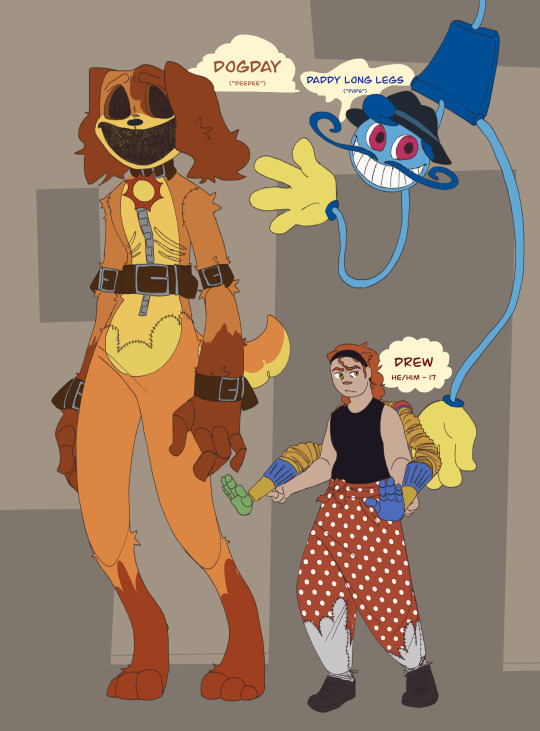
#Drew's pants got shredded in the train crash so he stole Miss Delight's skirt#and sewed part of his shirt to make pants#it's a little crusty#Woah Drew's got two dads? lucky#two orange coded mfs and a blue bitch/pos#all of them are traumatised#but only one is desensitised#That train crash fucked Drew UP dawg#he was so pissed#Poppy's gonna catch these hands frfr#dogday finds comfort in taking care of others#but REALLY likes being taken care of#Daddy long legs is just kinda there#love him though#dogday#dogday poppy playtime#daddy long legs#daddy long legs poppy playtime#drew poppy playtime#drew garland#three d's#pops poppy playtime#art#phrart#ask phrog#poppy playtime#poppy playtime chapter 3#poppy playtime fanart
483 notes
·
View notes
Text

I met the me who made different choices
#idk what this means so dont ask#got the words stuck in my head and this is what I wanted to draw for it immediately#me at my desk. so.#I dont look exactly like this obviously. doesnt matter. anyways#hard time recently in a lot of different ways#lots of work to do!#given up on getting everything done I kind of failed at that. it was too much#so now I'm just trying to get anything done that will make the next 6 months not kill me again#ideally. 3 episodes. or the book#or like at least close enough to that that its basically that#I'm feeling really screwed LOL#I dont know how I've been working every day for so long and still havent done enough...#(its because the work load is way too much)#every time I take 1 hour for myself. to cook. or clean. or draw something else. or play a game. I feel so guilty auauau#I hate webtoon I hate this damn green app...#DOESNT MATTER!!!#what DOES matter is my art is good as hell... look at this shit...#the light. the colors. I love you red I love you green#I need to get more red pants I only have the one pair.#I saw this guy with red pants that had skeleton legs on them and I was like FUUUUUUUUUUUUUUUUUUUUCK!!!!!!!!! I need them!!!!#I need to start sewing again. I dont have a sewing machine cause my apartment is too small so I havent sewn in years but I really want to..#I want to make clothes again... I need some vests I need some dresses..#I will not make pants or sleeved shirts because I dont hate myself#sketch#art#vent art I guess LMFAO its not#its just this fun little thing we like to call self expression#also this isnt how my desk setup actually is I scooted things around cause I didnt wanna draw anything twice. fuck it we ball#ok back to work
181 notes
·
View notes
Text
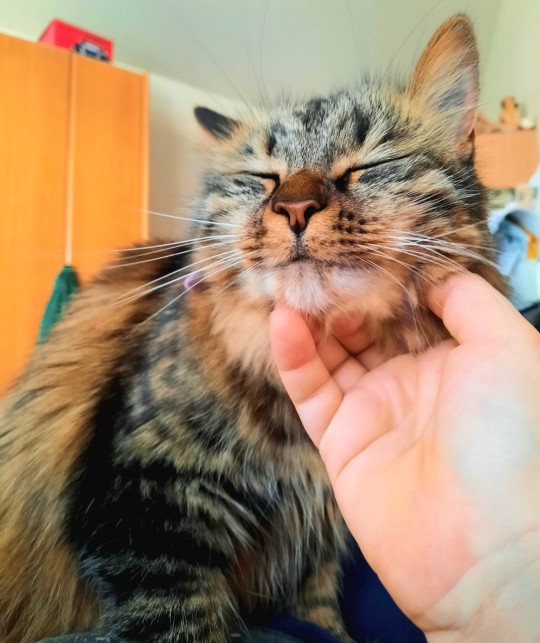
Everybody look at my beautiful baby enjoying some scritches✨️ i love her so much!!!💕💕
#mine#my cats#camaro#going to fix some pants now and if im lucky shes gonna stay next to me while i sew#wouldnt that be nice
278 notes
·
View notes
Text
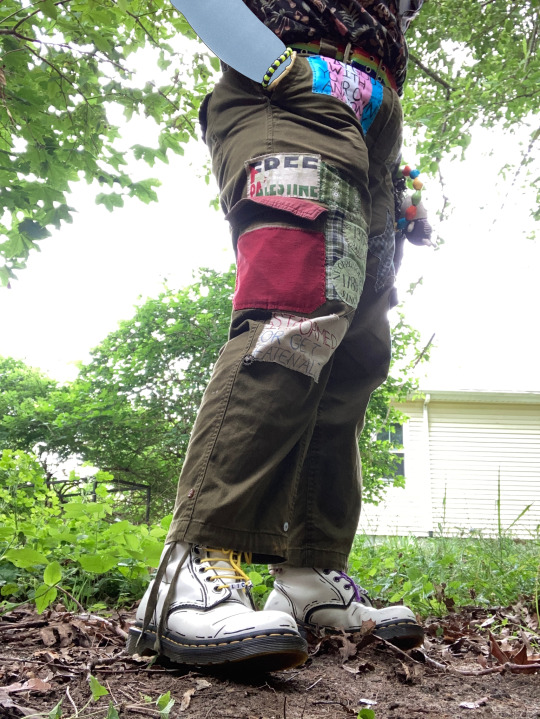
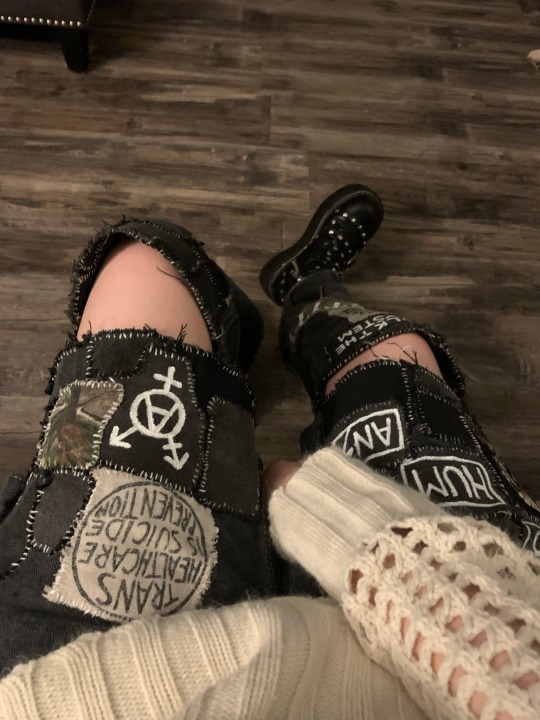
I was not expecting y’all to like those patches as much as y’all did but most of em are sewn on now so here’s the pants, also featuring my cartoon boots that I just painted yesterday
#pins and needles#diy#diy patches#patches#queer punk#solarpunk#trendercore#patch pants#hopepunk#eco punk#transgender#nonbinary#actually autistic#I spent an unreasonable amount of time covering all the skin I could see in these pictures#diy clothes#punk diy#hand sewing
174 notes
·
View notes
Text

frank sewing a patch with that little smirk~🎃
#this gif gives me motivation to keep working on my patch pants#gotta get them done by october#they’re just so much work tho 😭😭#how is he so hot sewing a fucking patch#what the fuck#like???#frank iero#frnkiebby#mcr5#mcr#mcrmy#frnkiero#frnkie#my chemical romance#my chem
414 notes
·
View notes